Classic Tuna Melt Sandwich – Comforting, Cheesy, and Easy
A Classic Tuna Melt Sandwich is one of those simple comforts that never goes out of style. Crisp, buttery bread on the outside, creamy tuna salad and melted cheese on the inside—there’s a reason it’s a diner favorite. It’s quick to make, uses pantry staples, and tastes like a warm hug.
Whether you need a fast lunch or a satisfying weeknight meal, this sandwich always hits the spot. Let’s make a version that’s dependable, balanced, and extra tasty without being fussy.

Classic Tuna Melt Sandwich - Comforting, Cheesy, and Easy
Ingredients
Method
- Prep the tuna salad. In a bowl, combine drained tuna, mayonnaise, Dijon, lemon juice or pickle brine, celery, onion, and dill pickle.Stir until just combined. Season with salt and pepper. Taste and adjust the mayo, acid, and seasoning to your liking.
- Dry the tuna well. If your tuna is watery, press it with paper towels before mixing.This keeps the sandwich from getting soggy and helps the filling cling together.
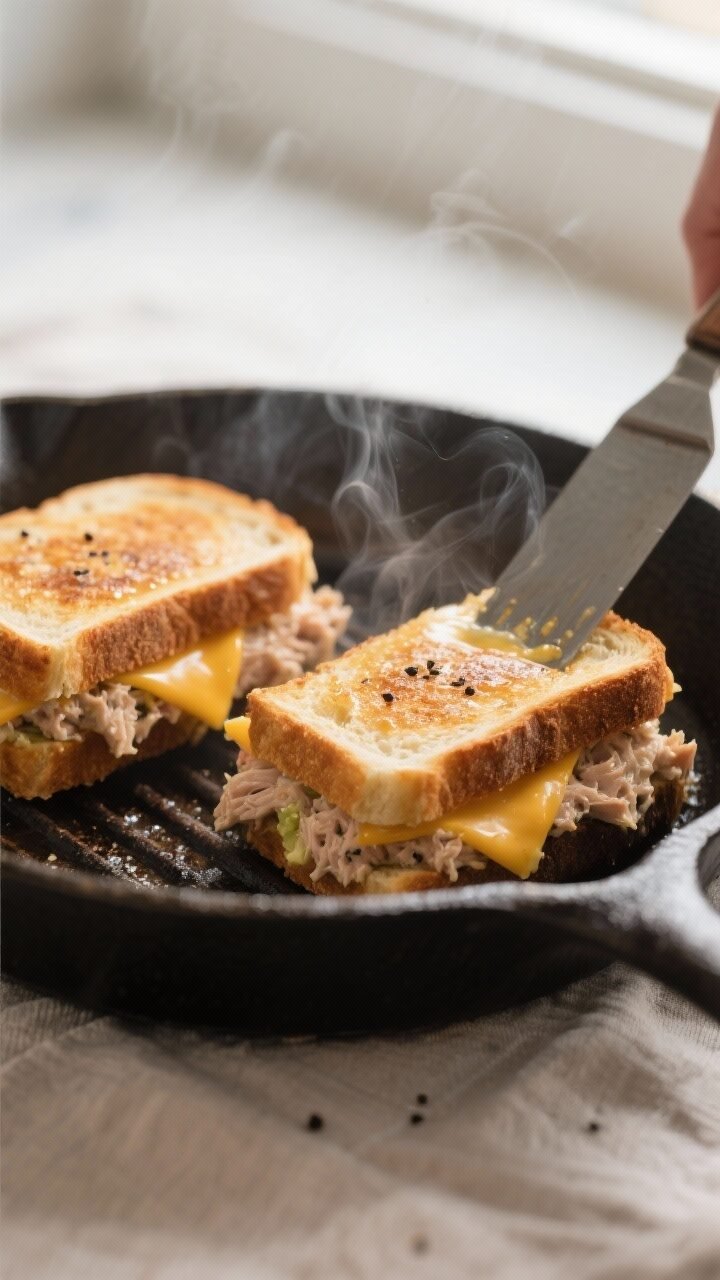
- Preheat your skillet. Place a large skillet or griddle over medium heat. Give it a couple of minutes to heat evenly. Medium heat helps melt the cheese without scorching the bread.
- Butter the bread. Spread a thin, even layer of softened butter on one side of each slice.The buttered sides will face the skillet and crisp up.
- Assemble the base. Lay two slices of bread, butter side down, in the hot skillet. Top each with a slice of cheese to create a “barrier” that protects the bread from moisture.
- Add the tuna filling. Spoon the tuna salad over the cheese layer, spreading it to the edges for even coverage. Don’t mound it too high; about 1/2 inch is perfect.
- Top with more cheese. Add a second slice of cheese on top of the tuna for that classic gooey melt.If using tomato slices, place them beneath the top cheese to prevent slipping.
- Close the sandwich. Place the remaining bread slices on top, butter side up.
- Grill slowly. Cook for 3–4 minutes per side, pressing gently with a spatula. Reduce heat if the bread browns too fast. The goal is deeply golden bread and fully melted cheese.
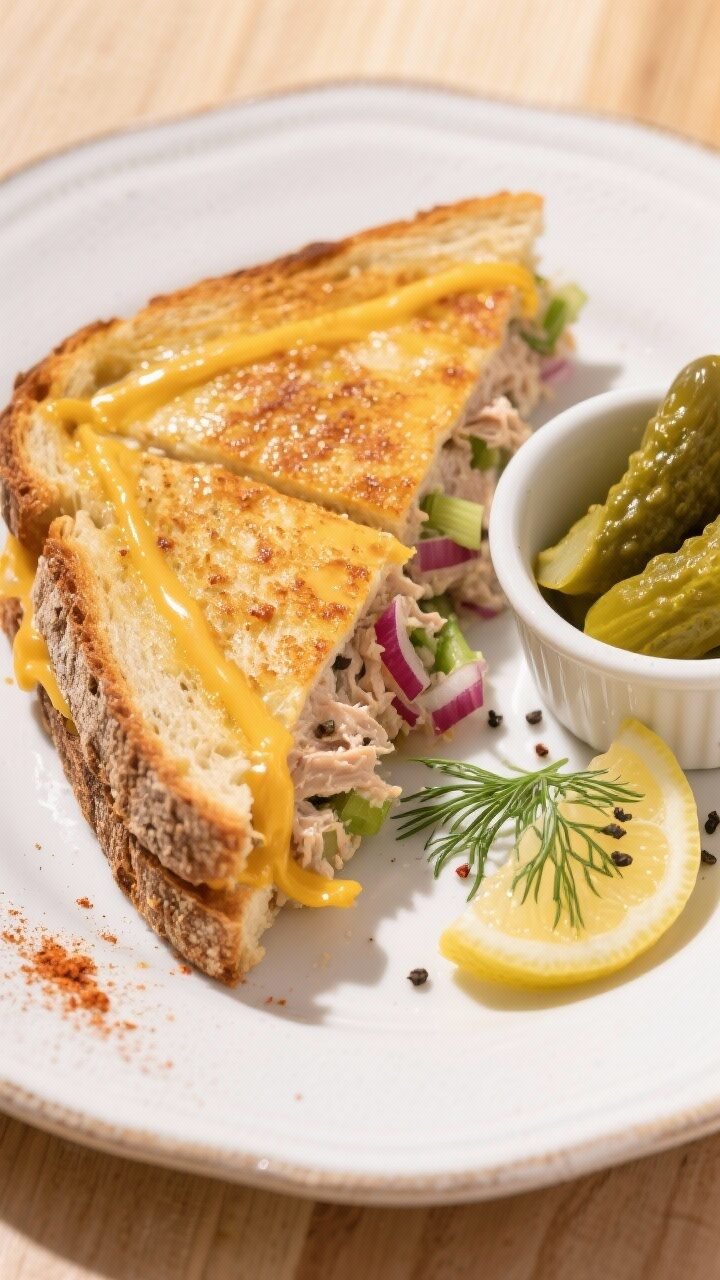
- Rest and slice. Transfer to a cutting board and let the sandwiches rest for 1–2 minutes.This helps the cheese set a bit. Slice diagonally and serve immediately.
Why This Recipe Works
This tuna melt keeps the balance right: not too mayo-heavy, not too dry, with just enough texture from celery and onion. The bread to filling ratio is spot on, so every bite is crisp, creamy, and cheesy.
Toasting the bread on both sides creates a sturdy base that won’t turn soggy. Using a skillet on medium heat guarantees gentle melting without burning the bread. A touch of acid—lemon juice or pickle brine—brightens the tuna and keeps the flavors lively.
Ingredients
- 2 cans (5 oz each) tuna, drained well (albacore or chunk light)
- 3 tablespoons mayonnaise (plus more to taste)
- 1 teaspoon Dijon mustard (optional, for a little tang)
- 1 tablespoon lemon juice or 2 teaspoons dill pickle brine
- 1 small celery stalk, finely diced
- 2 tablespoons red onion, finely minced
- 1 tablespoon dill pickle, finely chopped (optional but recommended)
- Salt and black pepper, to taste
- 4 slices sturdy bread (sourdough, rye, or thick sandwich bread)
- 4 slices cheese (sharp cheddar, Swiss, or provolone)
- 2 tablespoons butter, softened
- Optional add-ins: sliced tomato, a pinch of smoked paprika, fresh dill, or a dash of hot sauce
Step-by-Step Instructions
- Prep the tuna salad. In a bowl, combine drained tuna, mayonnaise, Dijon, lemon juice or pickle brine, celery, onion, and dill pickle.Stir until just combined. Season with salt and pepper. Taste and adjust the mayo, acid, and seasoning to your liking.
- Dry the tuna well. If your tuna is watery, press it with paper towels before mixing.This keeps the sandwich from getting soggy and helps the filling cling together.
- Preheat your skillet. Place a large skillet or griddle over medium heat. Give it a couple of minutes to heat evenly. Medium heat helps melt the cheese without scorching the bread.
- Butter the bread. Spread a thin, even layer of softened butter on one side of each slice.The buttered sides will face the skillet and crisp up.
- Assemble the base. Lay two slices of bread, butter side down, in the hot skillet. Top each with a slice of cheese to create a “barrier” that protects the bread from moisture.
- Add the tuna filling. Spoon the tuna salad over the cheese layer, spreading it to the edges for even coverage. Don’t mound it too high; about 1/2 inch is perfect.
- Top with more cheese. Add a second slice of cheese on top of the tuna for that classic gooey melt.If using tomato slices, place them beneath the top cheese to prevent slipping.
- Close the sandwich. Place the remaining bread slices on top, butter side up.
- Grill slowly. Cook for 3–4 minutes per side, pressing gently with a spatula. Reduce heat if the bread browns too fast. The goal is deeply golden bread and fully melted cheese.
- Rest and slice. Transfer to a cutting board and let the sandwiches rest for 1–2 minutes.This helps the cheese set a bit. Slice diagonally and serve immediately.
Storage Instructions
- Tuna salad: Store unused tuna salad in an airtight container in the fridge for up to 3 days. Stir before using.If it tightens up, add a small spoon of mayo or a splash of lemon juice.
- Assembled sandwiches: Tuna melts are best fresh. If you must store leftovers, wrap tightly and refrigerate for up to 1 day.
- Reheating: Re-crisp in a skillet over low-medium heat or toast in a 375°F (190°C) oven for 8–10 minutes. Avoid the microwave—it softens the bread and can make the filling watery.
Why This is Good for You
Tuna is a solid source of lean protein that keeps you full and fuels your day.
It provides omega-3 fats, which support heart and brain health. The celery and onion add fiber and antioxidants without weighing the sandwich down. If you choose whole-grain bread, you’ll get extra fiber and nutrients.
With reasonable mayo and balanced portions, this melt is satisfying without being heavy.
What Not to Do
- Don’t skip draining the tuna. Excess water leads to soggy bread and a loose filling.
- Don’t crank the heat. High heat burns the bread before the cheese melts. Medium is your friend.
- Don’t overload the filling. A towering sandwich falls apart and doesn’t heat through evenly.
- Don’t use flimsy bread. Thin, soft slices won’t hold up to the filling and heat. Choose sturdy bread.
- Don’t over-mayo the salad. You want creamy, not gloopy.Add mayo gradually and taste as you go.
Alternatives
- Lighter version: Use Greek yogurt for half the mayo, and pick whole-grain bread. The yogurt adds tang and protein while keeping things creamy.
- Spicy melt: Mix in hot sauce or chopped pickled jalapeños. Pepper Jack cheese is great here.
- Herby twist: Add fresh dill, chives, or parsley.A sprinkle of lemon zest brightens everything.
- No-mayo option: Mash tuna with olive oil, lemon juice, and a touch of Dijon. It’s silky and savory without the mayo.
- Cheese swaps: Try cheddar for sharpness, Swiss for nuttiness, provolone for melty mildness, or a mix. A little mozzarella adds extra stretch.
- Bread ideas: Sourdough for tang, rye for aromatic bite, or a sturdy multigrain for heartiness.
- Add veggies: Sliced tomato, baby spinach, or thinly sliced bell pepper add freshness and crunch.
FAQ
What kind of tuna is best for a tuna melt?
Either albacore or chunk light works.
Albacore is firmer and milder; chunk light has a more pronounced tuna flavor and slightly softer texture. Choose what you prefer, but drain it well.
Can I bake the sandwiches instead of using a skillet?
Yes. Assemble the melts on a sheet pan and bake at 400°F (200°C) for 8–10 minutes, flipping once if you want both sides crisp.
For extra browning, finish under the broiler for 1–2 minutes, watching closely.
How do I keep the bread from getting soggy?
Drain the tuna thoroughly, toast both sides of the bread in the skillet, and use a cheese slice under the tuna to create a moisture barrier. Avoid piling the filling too high.
Can I use canned salmon instead of tuna?
Absolutely. Canned salmon makes a great melt.
Remove any skin or bones, then mix and cook the same way. It pairs well with Swiss or cheddar and a squeeze of lemon.
What’s the best cheese for melting?
Cheddar, Swiss, provolone, and Monterey Jack melt beautifully. For extra pull, add a little low-moisture mozzarella.
Avoid very aged, crumbly cheeses that don’t melt smoothly.
Is there a dairy-free version?
Yes. Use a good-quality dairy-free cheese that melts well and swap butter for a neutral oil or dairy-free spread. The flavor will differ slightly, but the method stays the same.
How can I meal prep this?
Make the tuna salad up to 3 days ahead and store it chilled.
Assemble and grill the sandwiches right before eating for the best texture. You can also pre-slice cheese and portion bread to save time.
Can I make it in an air fryer?
Yes. Assemble the sandwich, then air fry at 375°F (190°C) for 5–7 minutes, flipping halfway.
Brush the outside with melted butter or spray lightly with oil for a golden crust.
Final Thoughts
A Classic Tuna Melt Sandwich is proof that simple ingredients can make a standout meal. With crisp bread, creamy tuna, and gooey cheese, it’s satisfying without being fussy. Keep your heat moderate, drain your tuna, and pay attention to balance—that’s the whole secret.
Once you’ve mastered the basics, try a few twists to make it your own. It’s quick, reliable comfort you’ll come back to again and again.