Decorating Ideas for Christmas Cookies – Fun, Festive, and Easy Tips
Christmas cookies are more than a sweet treat—they’re a tradition, a craft, and a way to make simple moments feel special. Whether you’re baking with kids, hosting a cookie swap, or just want a cozy afternoon project, decorating cookies is a low-pressure, high-reward activity. You don’t need fancy tools or pastry school skills to make them look beautiful.
With a few smart tricks and simple ingredients, your cookies can look bakery-worthy and taste amazing.

Decorating Ideas for Christmas Cookies - Fun, Festive, and Easy Tips
Ingredients
Method
- Bake and Cool Your Cookies: Start with cookies that are fully cooled and flat on top.Slightly thicker cookies hold decorations better. If needed, trim edges gently with a knife for clean shapes.
- Choose Your Icing: For clean outlines and long-lasting designs, make royal icing. For a quicker, softer finish, use a simple sugar glaze.Divide icing into bowls and tint with gel colors.
- Set Up Two Icing Consistencies: Make a thicker icing for outlining (think toothpaste texture) and a thinner icing for flooding (like honey). Add water a few drops at a time to thin.
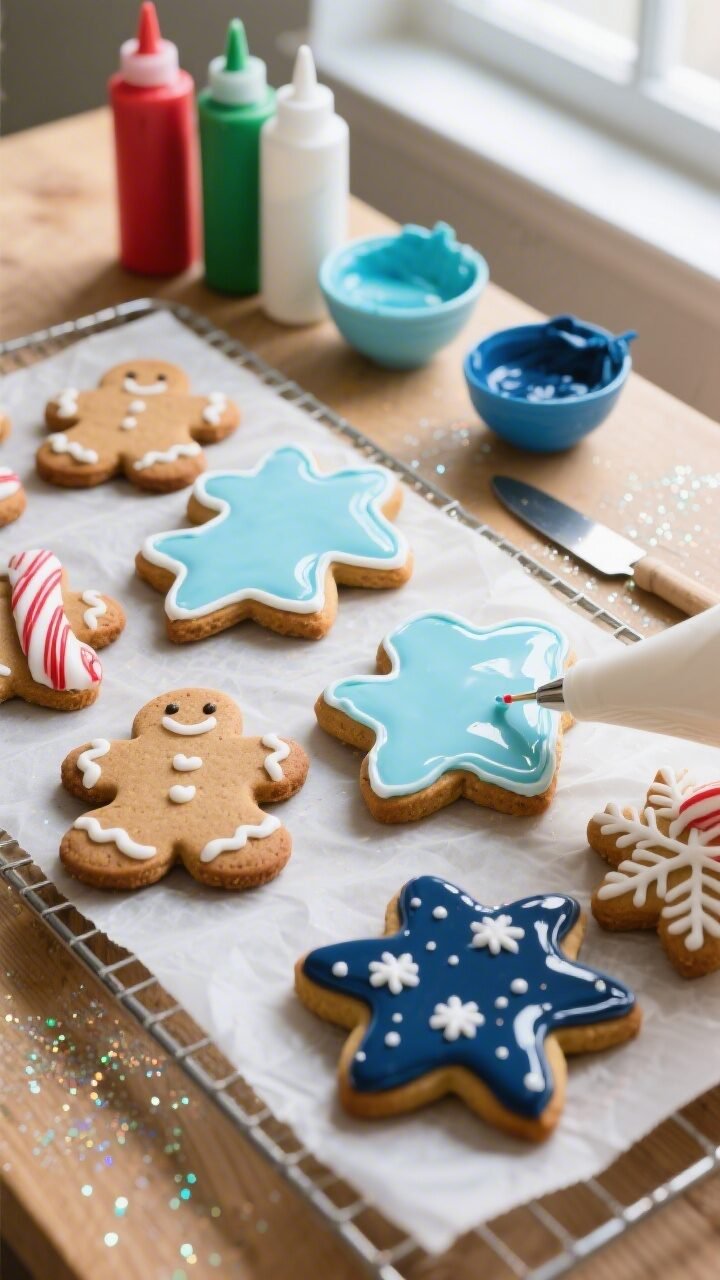
- Outline the Cookies: Pipe a neat border around the cookie edge using thick icing. This helps contain the flood icing and creates sharp edges.
- Flood the Surface: Fill the cookie with thinner icing.Use a toothpick to nudge icing into corners and pop air bubbles. Let it settle into a smooth surface.
- Basic Designs to Try: Snowfall: Flood in pale blue. While wet, add white dots and drag a toothpick slightly to make soft snowflake bursts.
- Candy Cane Stripes: Flood in white.Pipe red lines while still wet and drag a toothpick diagonally to create a striped pattern.
- Cozy Sweater: Flood in any color and let dry. Pipe zigzags, dots, and cables on top using thick icing for texture.
- Wreaths: Flood in white and let dry. Pipe small green dots around the edge, then pull a toothpick through them to make leaf shapes.Add red sprinkle “berries.”
- Snowmen Faces: Flood in white. Once set, add mini chocolate chips for eyes, an orange icing carrot nose, and a dotted smile.
- Starry Night: Flood in navy or black cocoa icing. Dust lightly with edible glitter and add tiny white dots for stars.
- Use the Wet-on-Wet Technique: Add details (polka dots, hearts, stripes) immediately after flooding so designs sink in and dry flat.This looks clean and professional.
- Add Texture After Drying: Let the base dry for at least 1–2 hours, then pipe details like ribbons, snow, or knit patterns with thicker icing for a raised effect.
- Sprinkle Smart: For maximum stick, add sprinkles while icing is still wet. For precision (like a ring of sugar on a wreath), wait until it’s tacky, not runny.
- Create “Snow”: Pipe white icing on trees or rooftops and dip gently into shredded coconut or sanding sugar. It gives soft sparkle and dimension.
- Quick No-Pipe Options: Spread glaze with a spoon or spatula and top with sprinkles.
- Dust cooled cookies with powdered sugar using a sifter for a snowy look.
- Dip half the cookie in melted white chocolate and finish with crushed peppermint.
- Let Them Dry Completely: Royal-iced cookies need 6–8 hours (or overnight) to set firm.Glazed cookies dry faster but can stay slightly tacky. Keep them uncovered on racks to dry.
- Finish and Package: Once dry, add final details (edible glitter, bows, tiny hearts). For gifting, place each cookie in a cellophane bag with a ribbon to protect the designs.
What Makes This Recipe So Good
These decorating ideas focus on simple techniques that still look polished. You’ll find options for both beginners and seasoned bakers, from easy powdered sugar glazes to royal icing details. The recipes use affordable, accessible ingredients and don’t require specialty equipment.
You can mix and match colors, textures, and designs with minimal mess. Best of all, these ideas are make-ahead friendly, so you can decorate at your own pace and still have gorgeous cookies ready for the holidays.
Ingredients
Choose a cookie base (sugar cookies, gingerbread, or shortbread) and then gather your decorations and icing. Here’s a helpful master list:
- Cookie Bases:
- Classic sugar cookies
- Gingerbread cookies
- Shortbread cookies
- Chocolate sugar cookies (for contrast)
- Royal Icing:
- Powdered sugar
- Meringue powder or pasteurized egg whites
- Water
- Vanilla or almond extract (optional)
- Gel food coloring
- Glaze Icing (Quick Option):
- Powdered sugar
- Milk or water
- Light corn syrup (for shine, optional)
- Vanilla or almond extract
- Gel food coloring
- Decorations:
- Sprinkles (jimmies, nonpareils, sanding sugar)
- Edible glitter or luster dust
- Mini chocolate chips
- Crushed peppermint candies
- Shredded coconut (snow effect)
- Mini marshmallows
- Colored sugars
- Candy eyes for snowmen or reindeer
- Optional Tools:
- Piping bags and small round tips (or zip-top bags)
- Squeeze bottles for flooding
- Toothpicks or scribe tool
- Cooling racks and parchment paper
- Small offset spatula
Step-by-Step Instructions

- Bake and Cool Your Cookies: Start with cookies that are fully cooled and flat on top.Slightly thicker cookies hold decorations better. If needed, trim edges gently with a knife for clean shapes.
- Choose Your Icing: For clean outlines and long-lasting designs, make royal icing. For a quicker, softer finish, use a simple sugar glaze.Divide icing into bowls and tint with gel colors.
- Set Up Two Icing Consistencies: Make a thicker icing for outlining (think toothpaste texture) and a thinner icing for flooding (like honey). Add water a few drops at a time to thin.
- Outline the Cookies: Pipe a neat border around the cookie edge using thick icing. This helps contain the flood icing and creates sharp edges.
- Flood the Surface: Fill the cookie with thinner icing.Use a toothpick to nudge icing into corners and pop air bubbles. Let it settle into a smooth surface.
- Basic Designs to Try:
- Snowfall: Flood in pale blue. While wet, add white dots and drag a toothpick slightly to make soft snowflake bursts.
- Candy Cane Stripes: Flood in white.Pipe red lines while still wet and drag a toothpick diagonally to create a striped pattern.
- Cozy Sweater: Flood in any color and let dry. Pipe zigzags, dots, and cables on top using thick icing for texture.
- Wreaths: Flood in white and let dry. Pipe small green dots around the edge, then pull a toothpick through them to make leaf shapes.Add red sprinkle “berries.”
- Snowmen Faces: Flood in white. Once set, add mini chocolate chips for eyes, an orange icing carrot nose, and a dotted smile.
- Starry Night: Flood in navy or black cocoa icing. Dust lightly with edible glitter and add tiny white dots for stars.
- Use the Wet-on-Wet Technique: Add details (polka dots, hearts, stripes) immediately after flooding so designs sink in and dry flat.This looks clean and professional.
- Add Texture After Drying: Let the base dry for at least 1–2 hours, then pipe details like ribbons, snow, or knit patterns with thicker icing for a raised effect.
- Sprinkle Smart: For maximum stick, add sprinkles while icing is still wet. For precision (like a ring of sugar on a wreath), wait until it’s tacky, not runny.
- Create “Snow”: Pipe white icing on trees or rooftops and dip gently into shredded coconut or sanding sugar. It gives soft sparkle and dimension.
- Quick No-Pipe Options:
- Spread glaze with a spoon or spatula and top with sprinkles.
- Dust cooled cookies with powdered sugar using a sifter for a snowy look.
- Dip half the cookie in melted white chocolate and finish with crushed peppermint.
- Let Them Dry Completely: Royal-iced cookies need 6–8 hours (or overnight) to set firm.Glazed cookies dry faster but can stay slightly tacky. Keep them uncovered on racks to dry.
- Finish and Package: Once dry, add final details (edible glitter, bows, tiny hearts). For gifting, place each cookie in a cellophane bag with a ribbon to protect the designs.
Storage Instructions
- Room Temperature: Store decorated cookies in an airtight container at room temp for 5–7 days.Separate layers with parchment paper.
- Freezing: Freeze undecorated cookies for up to 2 months. For decorated cookies, freeze once icing is fully dry, wrapped well to prevent condensation.
- Thawing: Thaw in the container at room temperature to avoid moisture forming on the icing. Do not thaw uncovered.
- Transport: Use rigid tins or boxes.Add bubble wrap or crumpled parchment between layers to prevent breakage.
Health Benefits
Christmas cookies are a treat, but you can make a few thoughtful choices. Use real butter for better flavor and satisfaction, which can help with mindful portions. Consider whole wheat pastry flour for a subtle fiber boost in sugar cookies.
Add spices like cinnamon, ginger, and cloves, which bring flavor with no extra sugar. If you need a lighter icing, a simple powdered sugar and milk glaze can be used sparingly compared to heavy frosting.
What Not to Do
- Don’t decorate warm cookies. Heat melts icing and warps edges.
- Don’t thin icing too much.Overly runny icing won’t hold outlines or details.
- Don’t stack wet cookies. Let them dry completely before storing.
- Don’t overload with toppings. Heavy sprinkles and candies can crack the icing.
- Don’t skip taste.Pretty cookies should still taste great—use good vanilla and a pinch of salt.
Alternatives
- Dairy-Free: Use dairy-free butter and plant-based milk for glaze.
- Gluten-Free: Choose a 1:1 gluten-free baking flour. Chill dough longer for cleaner cutouts.
- No Food Coloring: Use natural powders like matcha (green), cocoa (brown), beet powder (pink), or turmeric (gold). Keep tones soft and festive.
- No-Pipe Method: Dip cookies in melted chocolate or white chocolate and add crushed peppermint, chopped nuts, or coconut.
- Flavor Twists: Add almond, peppermint, or orange zest to the dough or icing for a seasonal upgrade.
FAQ
How do I get smooth, shiny icing?
Use royal icing with the right consistency and add a tiny bit of corn syrup for shine.
Flood evenly, pop air bubbles with a toothpick, and let cookies dry uncovered at room temperature until fully set.
Can I decorate cookies without a piping bag?
Yes. Use zip-top bags with a tiny corner snipped, squeeze bottles for flooding, or a spoon and offset spatula for simple glazes. For details, a toothpick can help draw fine lines or place small dots.
How long should I let cookies dry before packaging?
For royal icing, plan for 6–8 hours, or overnight if you can.
Glazes may be ready in 2–4 hours, but test one cookie by gently tapping the surface. If it’s firm and not tacky, you’re good to go.
What’s the best icing for cookie swaps and shipping?
Royal icing holds up best since it dries hard and travels well. Keep designs slightly raised to avoid sticking, and cushion cookies with parchment and padding in rigid boxes.
How do I prevent icing colors from bleeding?
Use gel food colors, avoid overly thin icing, and let each color set before adding a contrasting color on top.
Dry cookies in a cool, low-humidity area and avoid covering them while drying.
Why is my icing dull or bumpy?
It may be too thick or drying too fast. Thin slightly with water, mix to smooth out air bubbles, and tap the cookie gently to settle the surface. A tiny bit of corn syrup can add sheen.
What are some easy kid-friendly designs?
Try sprinkle-dipped trees, smiley snowmen with candy eyes, or simple star cookies dusted with sanding sugar.
Let kids use squeeze bottles and pre-colored icing for less mess.
Final Thoughts
Decorating Christmas cookies should feel joyful, not stressful. Start with a few colors, lean on simple shapes, and build from there as you get comfortable. The best cookies are the ones you enjoyed making, shared freely, and ate with a smile.
Turn on some music, set out bowls of sprinkles, and let the holiday spirit do the rest.