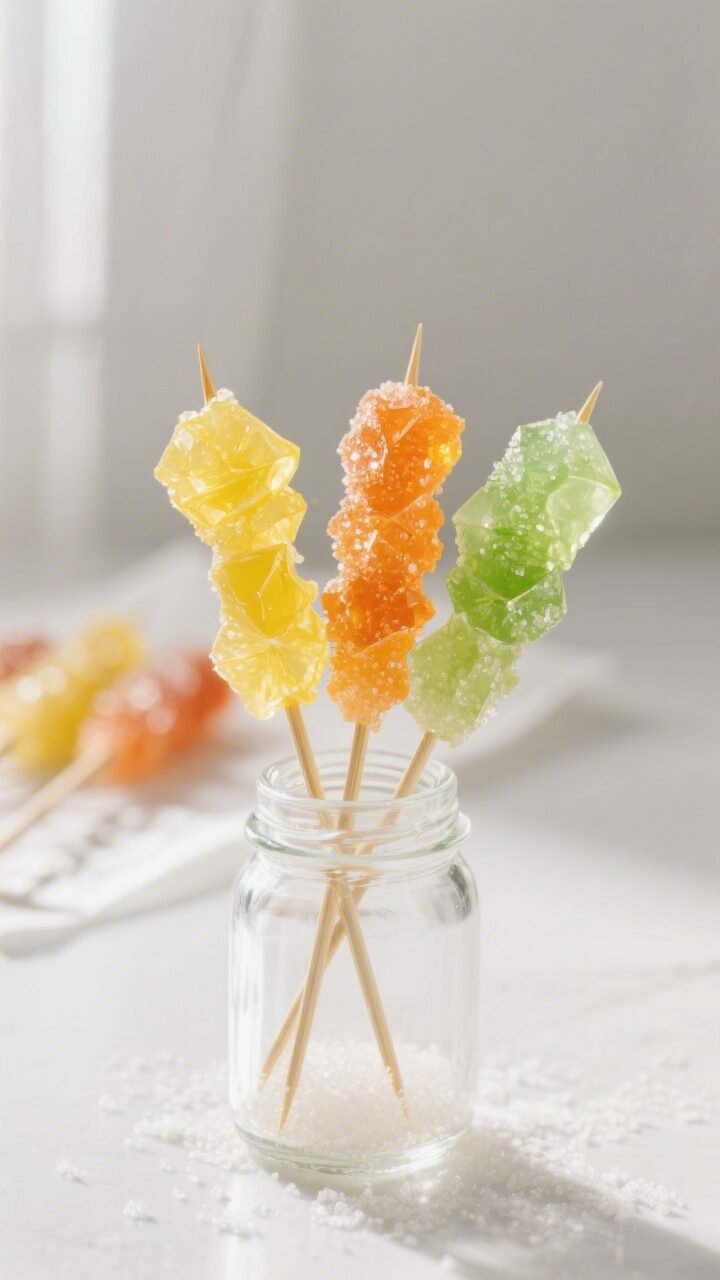
Easy Homemade Rock Candy – A Fun, Colorful Treat You Can Make at Home
Making rock candy at home feels a little like magic and a little like science class. With just sugar, water, and patience, you can grow sparkling crystals right in your kitchen. Kids love watching the crystals form day by day, and adults appreciate how budget-friendly it is.
The best part is you can customize the colors and flavors however you like. Whether you’re making a rainy-day project, a party favor, or a gift, this is a sweet recipe that’s hard to resist.
Easy Homemade Rock Candy - A Fun, Colorful Treat You Can Make at Home
Ingredients
Method
- Prepare your skewers: Dip wooden skewers in water, then roll them in granulated sugar to coat the lower half.Set them on a plate to dry completely. This “seed coat” helps crystals form faster and more evenly.
- Clean your jars: Wash and dry your jars so there’s no residue. Choose jars tall enough to keep skewers suspended without touching the bottom.
- Make the sugar syrup: Add 2 cups of water to a medium saucepan.Bring it to a gentle simmer over medium heat. Slowly add 4 cups of sugar, about 1/2 cup at a time, stirring until it dissolves fully before adding more.
- Reach supersaturation: Once all sugar is added, keep heating and stirring until the liquid turns clear and slightly thick. You should see a glossy, syrupy consistency with no undissolved grains.If grains persist, add a spoonful more sugar and stir to dissolve. Do not boil vigorously.
- Add color and flavor: Remove the pan from the heat. Stir in 1–2 drops of food coloring and 1/4 to 1/2 teaspoon of your chosen extract.A little flavor goes a long way.
- Cool the syrup slightly: Let the syrup sit for 10–15 minutes. Hot syrup can melt the seed sugar on your skewers, so you want it warm but not scalding.
- Fill the jars: Carefully pour the warm syrup into the jars, leaving about 1 inch of headspace. If you want multiple colors, divide the syrup and tint each jar separately.
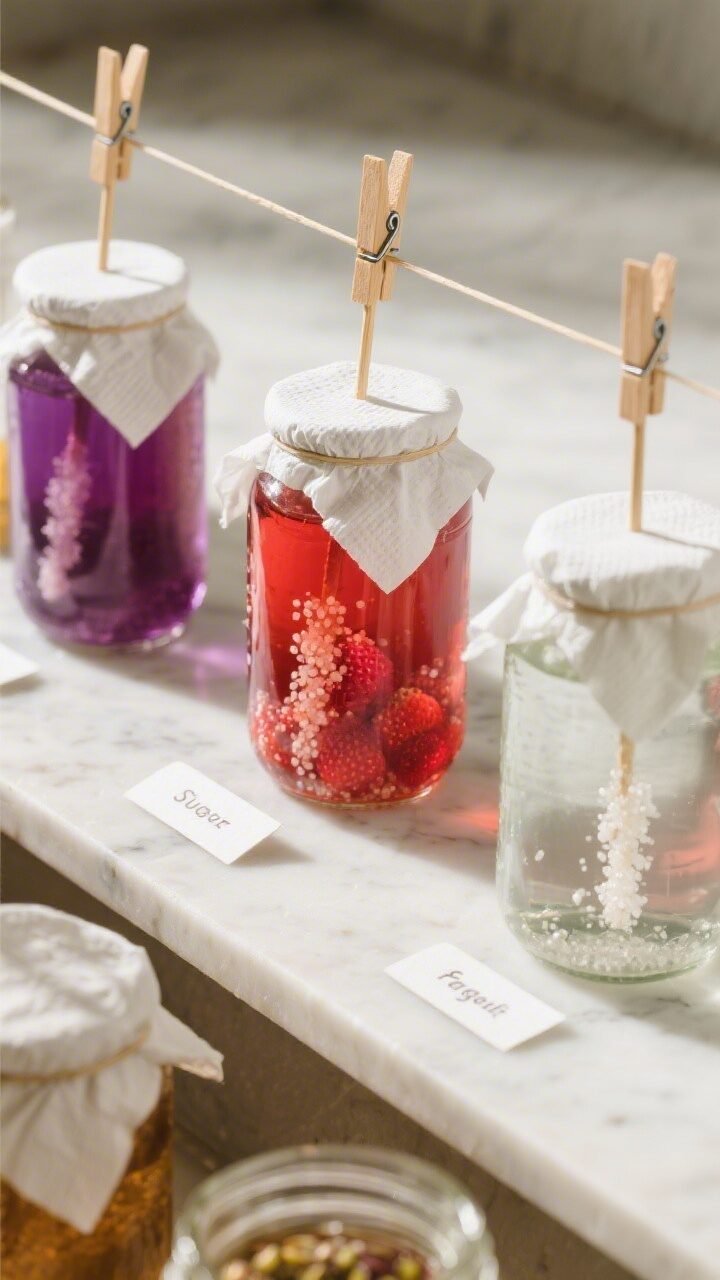
- Insert skewers: Place a sugar-coated skewer into each jar.Use a clothespin across the jar opening to hold the skewer centered and suspended. The tip should hover about 1/2 inch from the bottom and not touch the sides.
- Let crystals grow: Set the jars in a cool, undisturbed area at room temperature. Cover the tops loosely with paper towels or coffee filters to keep dust out while allowing moisture to escape.
- Check daily: Within 24–48 hours, you should see crystals forming on the skewer.Let them grow for 5–7 days until they reach your desired size. The longer you wait, the larger the crystals.
- Remove and dry: When ready, lift the skewers out and let them drip briefly over the jar. Place them on a parchment-lined plate to dry for 1–2 hours, until no longer sticky.
- Clean up and store: If you plan to make more candy, you can gently reheat leftover syrup to dissolve any crystals and reuse it.Otherwise, soak jars in hot water for easy cleanup.
What Makes This Recipe So Good
This rock candy recipe uses simple ingredients and requires no special equipment beyond jars and wooden skewers. It’s perfect for beginners because the steps are straightforward and consistent results are easy to achieve if you follow a few key tips.
You can control the color and flavor to match any theme or preference, from bright lemon to deep grape. It’s also a teaching moment: you’ll see how a supersaturated solution turns into solid sugar crystals over time. Plus, it’s incredibly satisfying to watch your candy grow, and even more satisfying to snack on it afterward.
Shopping List
- Granulated sugar (about 4 cups for 2–3 sticks of candy)
- Water (about 2 cups)
- Food coloring (gel or liquid)
- Flavor extracts (optional: vanilla, lemon, peppermint, strawberry, etc.)
- Wooden skewers or clean cotton strings
- Glass jars (1 per candy stick)
- Clothespins or clips (to hold skewers in place)
- Small plates or parchment paper (for drying sugar-coated skewers)
Instructions
- Prepare your skewers: Dip wooden skewers in water, then roll them in granulated sugar to coat the lower half.Set them on a plate to dry completely. This “seed coat” helps crystals form faster and more evenly.
- Clean your jars: Wash and dry your jars so there’s no residue. Choose jars tall enough to keep skewers suspended without touching the bottom.
- Make the sugar syrup: Add 2 cups of water to a medium saucepan.Bring it to a gentle simmer over medium heat. Slowly add 4 cups of sugar, about 1/2 cup at a time, stirring until it dissolves fully before adding more.
- Reach supersaturation: Once all sugar is added, keep heating and stirring until the liquid turns clear and slightly thick. You should see a glossy, syrupy consistency with no undissolved grains.If grains persist, add a spoonful more sugar and stir to dissolve. Do not boil vigorously.
- Add color and flavor: Remove the pan from the heat. Stir in 1–2 drops of food coloring and 1/4 to 1/2 teaspoon of your chosen extract.A little flavor goes a long way.
- Cool the syrup slightly: Let the syrup sit for 10–15 minutes. Hot syrup can melt the seed sugar on your skewers, so you want it warm but not scalding.
- Fill the jars: Carefully pour the warm syrup into the jars, leaving about 1 inch of headspace. If you want multiple colors, divide the syrup and tint each jar separately.
- Insert skewers: Place a sugar-coated skewer into each jar.Use a clothespin across the jar opening to hold the skewer centered and suspended. The tip should hover about 1/2 inch from the bottom and not touch the sides.
- Let crystals grow: Set the jars in a cool, undisturbed area at room temperature. Cover the tops loosely with paper towels or coffee filters to keep dust out while allowing moisture to escape.
- Check daily: Within 24–48 hours, you should see crystals forming on the skewer.Let them grow for 5–7 days until they reach your desired size. The longer you wait, the larger the crystals.
- Remove and dry: When ready, lift the skewers out and let them drip briefly over the jar. Place them on a parchment-lined plate to dry for 1–2 hours, until no longer sticky.
- Clean up and store: If you plan to make more candy, you can gently reheat leftover syrup to dissolve any crystals and reuse it.Otherwise, soak jars in hot water for easy cleanup.
Storage Instructions
Keep rock candy in an airtight container or sealed bag at room temperature. Moisture is the enemy, so avoid storing it in humid spots like near the stove or dishwasher. Properly stored, it stays fresh and crunchy for several weeks. If pieces get sticky, place them in a dry spot with a silica gel packet (not touching the candy) to help absorb moisture.
Health Benefits
Rock candy is a treat, not a health food, but there are a few notes worth mentioning.
A small piece can help settle an uneasy stomach, especially if flavored with ginger or peppermint extract. It also provides quick energy thanks to its simple carbohydrates, which can be useful in limited situations like a brief pick-me-up.
That said, rock candy is mostly sugar. Enjoy it in moderation to support dental and overall health.
For those with specific dietary needs, you can make it dye-free and select flavors without allergens, keeping the ingredient list short and transparent.
What Not to Do
- Don’t rush the process. If you disturb the jars or touch the skewers too often, crystals may break or stop growing.
- Don’t skip the seed coat. Bare skewers take much longer and grow uneven crystals.
- Don’t boil the syrup aggressively. Vigorous boiling can cause crystallization in the pot and lead to cloudy candy.
- Don’t let the skewer touch the jar. Contact points interrupt crystal formation and can weld your candy to the glass.
- Don’t add too much flavoring. Strong extracts can become overpowering and even bitter. Start small.
- Don’t store uncovered. Humidity makes rock candy sticky and dulls the shine.
Variations You Can Try
- Swirled Colors: Add one drop of a second dye and lightly swirl with a toothpick in the jar before inserting the skewer.
- Citrus Trio: Make three jars with lemon, orange, and lime. The colors look beautiful together for party favors.
- Minty Stirrers: Use peppermint-flavored rock candy as a fun stir stick for hot cocoa.
- Natural Hues: Try natural food colorings like beet powder, spirulina, or turmeric for subtle tones.
- Shaped Crystals: Tie a cotton string to a pencil and suspend it in the jar.Strings often form dense, dramatic clusters.
- Sour Candy: Dust finished candy lightly with a citric acid and sugar mix for a tangy finish.
FAQ
Why isn’t my rock candy growing?
Usually the solution wasn’t supersaturated enough, or the room is too cold or too warm. Make sure all sugar dissolves completely, and use the seed-coated skewer. Keep jars at steady room temperature and away from vibrations.
How long does rock candy take to form?
You’ll see small crystals within 1–2 days, with full-size candy in 5–7 days.
Larger clusters can take up to two weeks. Patience leads to better clarity and structure.
Can I use brown sugar or alternative sweeteners?
Brown sugar forms crystals but results in a darker color and molasses flavor. Most alternative sweeteners don’t crystallize the same way and won’t work for classic rock candy.
What if crystals form on the jar instead of the skewer?
That means the jar provided better nucleation points.
Next time, rinse the inside of the jar with hot water before pouring in the syrup, and make sure your skewer has a solid sugar coat and stays centered.
Is it safe for kids to help?
Yes, with supervision. Adults should handle hot syrup. Kids can coat skewers, choose colors and flavors, and check the growth each day.
How do I make very clear crystals?
Use clean equipment, dissolve sugar thoroughly, avoid vigorous boiling, and keep the jars undisturbed.
Clear extracts and gel colors help prevent cloudiness.
Can I reuse the leftover syrup?
Yes. Strain out any crystals, reheat gently until dissolved, and use it for another batch. You may need to add a bit more sugar to reach supersaturation again.
What size jars work best?
Standard 8–12 ounce glass jars are ideal.
You want enough depth for the skewer to hang without touching the bottom and enough space for crystals to grow around it.
How do I prevent the seed sugar from dissolving?
Let the syrup cool for 10–15 minutes before inserting skewers. If it’s steaming heavily, it’s still too hot. A warm, not scalding, syrup protects the seed layer.
Can I make it without food coloring?
Absolutely.
Leave the syrup clear for classic, glassy crystals, or use natural colorings for a softer look.
Final Thoughts
Easy Homemade Rock Candy is a low-cost, high-reward project that blends creativity with a bit of kitchen science. With a few basic tools and some patience, you’ll end up with sparkling, customizable candy that tastes as good as it looks. Keep the process calm, the jars undisturbed, and your flavor choices simple.
In about a week, you’ll have a sweet, colorful treat worth showing off—and sharing.