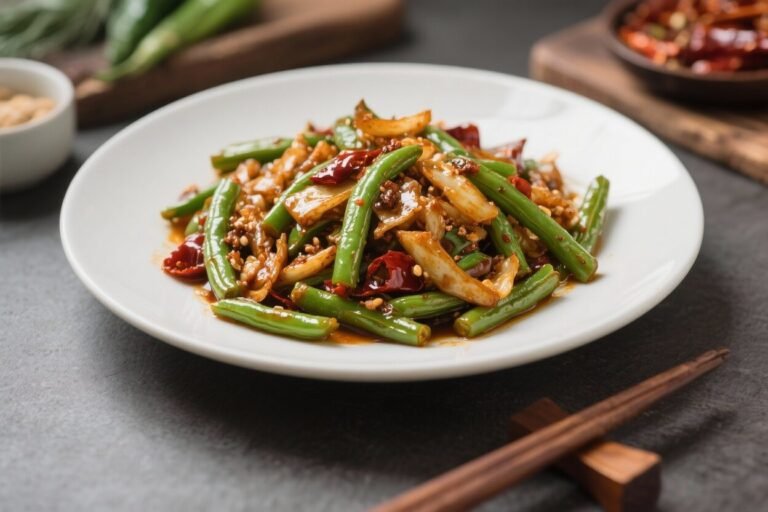
Garlic Butter Sauteed Green Beans – Simple, Flavorful, and Weeknight-Friendly
Green beans don’t need much to taste great, and this recipe proves it. With a little butter, fresh garlic, and a quick sauté, you get crisp-tender beans that feel both comforting and fresh. They pair with almost anything—grilled chicken, roasted salmon, or a simple bowl of rice.
Best of all, they come together fast and use ingredients you probably already have. This is one of those easy sides you’ll make on repeat.

Garlic Butter Sauteed Green Beans - Simple, Flavorful, and Weeknight-Friendly
Ingredients
Method
- Prep the beans: Rinse and dry the green beans. Trim the stem ends.If using frozen beans, don’t thaw—just add a minute or two to the cooking time.
- Heat the pan: Set a large skillet over medium heat. Add the olive oil and butter. When the butter is melted and foamy, you’re ready to cook.
- Sauté the beans: Add the green beans in an even layer.Sprinkle with salt and pepper. Cook, stirring every minute or so, until they turn bright green and get a few golden spots, about 4–5 minutes.
- Quick steam: Add 2–3 tablespoons of water or broth and immediately cover the pan. Steam for 2–3 minutes to soften the beans while keeping them crisp.
- Add the garlic: Uncover and push the beans to create a bit of space.Add the garlic to the butter in the pan. Cook 30–45 seconds, stirring, until fragrant. Toss the beans to coat them in the garlic butter.
- Taste and finish: Adjust salt and pepper.If you like, add a squeeze of lemon, a pinch of red pepper flakes, or a shower of Parmesan. Cook 30 seconds more to meld flavors.
- Serve warm: Transfer to a serving dish. Finish with toasted almonds or parsley for a little crunch and color.
What Makes This Recipe So Good

- Fast and fuss-free: From pan to plate in under 15 minutes, no oven required.
- Big flavor, few ingredients: Butter and garlic deliver a rich, savory finish without overpowering the beans.
- Perfect texture: Crisp-tender green beans that aren’t mushy or squeaky—just right.
- Flexible: Works with fresh or frozen beans and easy to adapt with seasonings, lemon, or Parmesan.
- Weeknight-ready: Minimal prep and cleanup, but nice enough for a holiday table.
What You’ll Need
- 1 pound fresh green beans, trimmed (you can leave them whole or cut into 2-inch pieces)
- 2 tablespoons unsalted butter (plus 1 extra tablespoon if you like it extra buttery)
- 1 tablespoon olive oil (helps prevent the butter from burning)
- 3–4 cloves garlic, finely minced or pressed
- 1/2 teaspoon kosher salt, plus more to taste
- 1/4 teaspoon black pepper, freshly ground
- 2–3 tablespoons water or broth (for a quick steam to soften the beans)
- Optional finishers: Lemon zest or a squeeze of lemon juice, red pepper flakes, grated Parmesan, toasted almonds, or chopped parsley
Step-by-Step Instructions

- Prep the beans: Rinse and dry the green beans. Trim the stem ends.If using frozen beans, don’t thaw—just add a minute or two to the cooking time.
- Heat the pan: Set a large skillet over medium heat. Add the olive oil and butter. When the butter is melted and foamy, you’re ready to cook.
- Sauté the beans: Add the green beans in an even layer.Sprinkle with salt and pepper. Cook, stirring every minute or so, until they turn bright green and get a few golden spots, about 4–5 minutes.
- Quick steam: Add 2–3 tablespoons of water or broth and immediately cover the pan. Steam for 2–3 minutes to soften the beans while keeping them crisp.
- Add the garlic: Uncover and push the beans to create a bit of space.Add the garlic to the butter in the pan. Cook 30–45 seconds, stirring, until fragrant. Toss the beans to coat them in the garlic butter.
- Taste and finish: Adjust salt and pepper.If you like, add a squeeze of lemon, a pinch of red pepper flakes, or a shower of Parmesan. Cook 30 seconds more to meld flavors.
- Serve warm: Transfer to a serving dish. Finish with toasted almonds or parsley for a little crunch and color.
Keeping It Fresh
- Make ahead: Trim beans up to 2 days in advance and store them in a sealed container lined with a paper towel.
- Storage: Leftover cooked beans keep in the fridge for 3–4 days in an airtight container.
- Reheating: Warm in a skillet over medium heat with a small pat of butter or a splash of water for 2–3 minutes.Microwave works too, but the texture is best from the stove.
- Freezing: Not ideal once cooked with butter and garlic, but you can freeze blanched green beans for up to 3 months and sauté them later.
Benefits of This Recipe
- Balanced flavor: Butter and garlic enhance the natural sweetness of green beans without heavy sauces.
- Nutritious: Green beans are a good source of fiber, vitamin C, vitamin K, and antioxidants.
- All-season: Works year-round with fresh or frozen beans, and fits alongside countless main dishes.
- Scales easily: Double or triple for gatherings with minimal extra effort.
- Family-friendly: Mild enough for picky eaters, but customizable for adventurous palates.
Pitfalls to Watch Out For
- Burning the garlic: Garlic cooks fast. Add it near the end and keep the heat at medium so it turns fragrant, not bitter.
- Mushy beans: Over-steaming or overcooking makes them limp. Aim for bright green and crisp-tender.
- Dry pan: If the pan looks dry before the steam step, add a splash of water or broth to prevent scorching.
- Crowding the pan: Too many beans can steam instead of sear.Use a large skillet or cook in batches.
- Under-seasoning: Salt brings out the sweetness. Taste and adjust before serving.
Recipe Variations
- Lemon-Parmesan: Add 1 teaspoon lemon zest, a squeeze of juice, and 2–3 tablespoons grated Parmesan at the end.
- Spicy Garlic: Add 1/4–1/2 teaspoon red pepper flakes with the garlic for heat.
- Almondine Twist: Toast 1/4 cup sliced almonds in the butter before adding the beans. Finish with lemon.
- Bacon Butter: Cook 2–3 strips of chopped bacon until crisp.Use some bacon fat in place of olive oil, then finish with butter and garlic. Crumble bacon over the top.
- Herb Lovers: Stir in chopped parsley, chives, or dill at the end for a fresh lift.
- Miso-Garlic: Whisk 1 teaspoon white miso into the melted butter off heat for umami depth.
- Shallot and Garlic: Sauté 1 thinly sliced shallot for 2 minutes before adding the beans for sweeter aromatics.
FAQ
Do I need to blanch the green beans first?
Blanching isn’t necessary here because the quick steam step softens the beans while preserving their color and snap. If you prefer an even brighter green and extra-crisp texture, you can blanch for 2 minutes, shock in ice water, then sauté briefly with the garlic butter.
Can I use frozen green beans?
Yes.
Add them straight from the freezer to the hot pan. Cook a bit longer to evaporate extra moisture, then proceed with the steam and garlic steps. The texture will be slightly softer than fresh, but still tasty.
What kind of pan works best?
A large stainless steel or cast-iron skillet is ideal for a light sear and even heat.
Nonstick works too, but you may get fewer browned spots.
How do I prevent the garlic from burning?
Keep the heat at medium, add the garlic after the beans have mostly cooked, and stir constantly for 30–45 seconds. If the pan looks too hot, pull it off the heat for a few seconds, then return it.
Can I make it dairy-free?
Absolutely. Use all olive oil or a dairy-free butter substitute.
A splash of good olive oil at the end adds richness and shine.
What proteins pair well with this?
These beans go well with roasted chicken, pork chops, grilled steak, salmon, shrimp, or a veggie-forward grain bowl. They’re versatile enough for almost any main.
How do I keep the beans bright green?
Don’t overcook. The beans should be vibrant and slightly firm.
The quick steam helps, and finishing with lemon can also brighten the color and flavor.
Can I add onions or mushrooms?
Yes. Sauté sliced onions or mushrooms in the butter and oil first until softened and browned, remove them, cook the beans, then add everything back with the garlic at the end.
Wrapping Up
Garlic Butter Sauteed Green Beans are the kind of side dish that makes dinner feel complete without extra work. They’re quick, adaptable, and built on pantry staples.
Keep this method in your back pocket, then tweak it with lemon, cheese, or crunchy toppings depending on your mood. Simple, reliable, and always satisfying—that’s the beauty of this recipe.