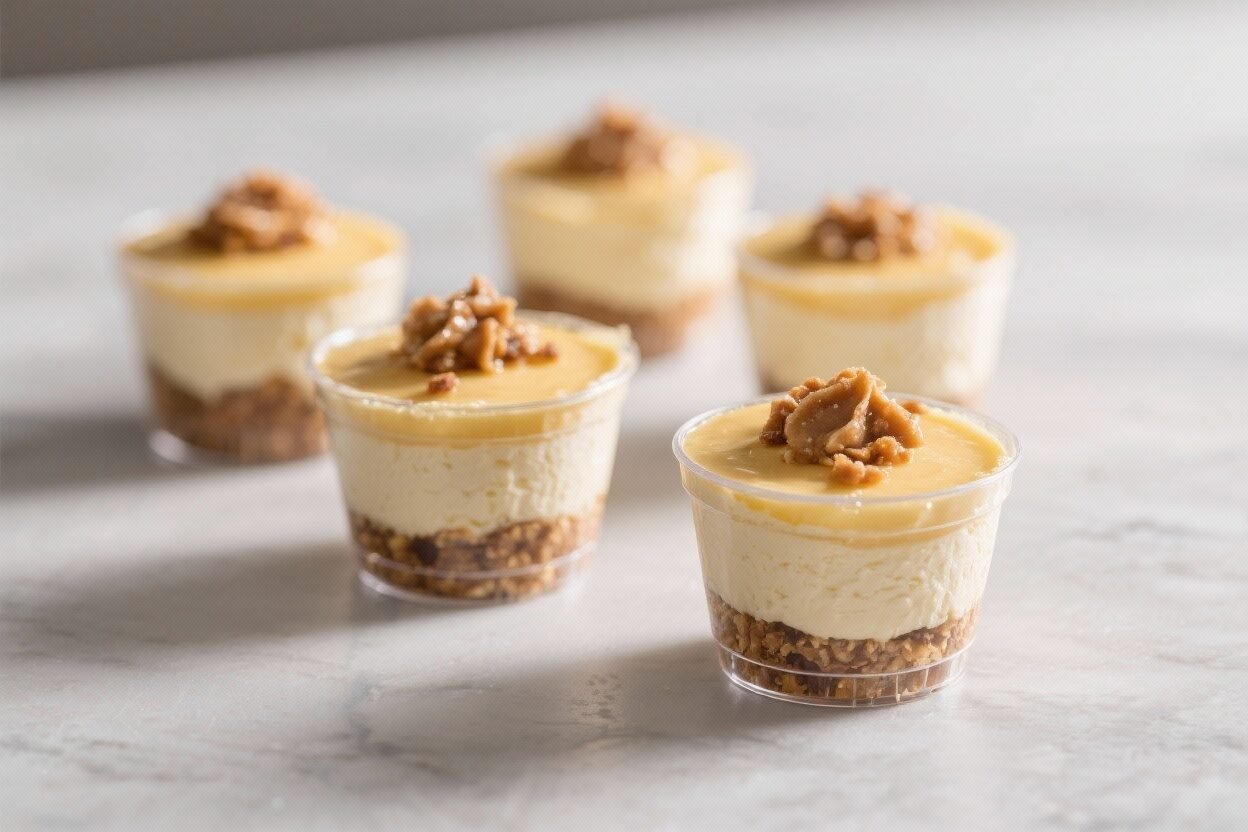
No-Bake Cheesecake Dessert Cups – Creamy, Simple, and Ready to Chill
No-bake cheesecake dessert cups are the kind of treat you pull together when you want something special without turning on the oven. They’re cool, creamy, and layered with just the right amount of crunch. The portions are individual, so they look polished on a tray and feel fun to eat with a spoon.
You can customize the toppings to match the season or what you already have. Best of all, the texture is silky and satisfying, and the prep is straightforward. If you like desserts that feel impressive but take minimal effort, this one’s a keeper.
No-Bake Cheesecake Dessert Cups – Creamy, Simple, and Ready to Chill
Ingredients
Method
- Prep your tools. Set out 8–10 small cups. Bring cream cheese to room temperature so it blends smoothly. Chill a mixing bowl and beaters for whipping cream.
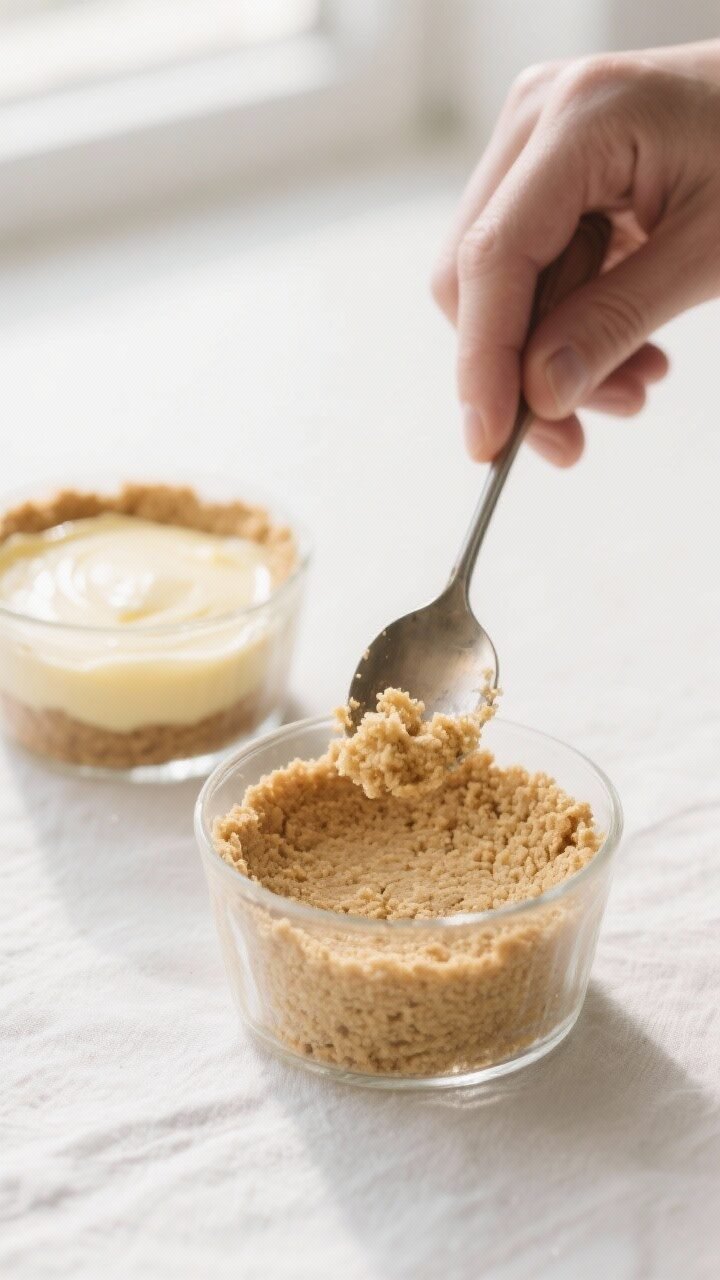
- Make the crust crumbs. Crush graham crackers in a food processor or a zip-top bag with a rolling pin until fine.Aim for sandy crumbs with a few tiny bits for texture.
- Add butter and salt. Stir melted butter and a pinch of salt into the crumbs until they feel like damp sand. If the mixture looks dry, add another teaspoon of butter.
- Layer the crust. Spoon 2–3 tablespoons of crumb mixture into each cup. Press down gently with the back of a spoon or a small glass to form a compact base.Chill while you make the filling.
- Whip the cream. In your chilled bowl, whip heavy cream to medium-stiff peaks. Don’t overmix. Set aside.
- Beat the cream cheese. In a separate bowl, beat cream cheese until smooth and fluffy, 2–3 minutes.Add sugar, vanilla, and lemon juice. Beat until silky with no lumps. If using sour cream, blend it in now.
- Fold in the whipped cream. Gently fold the whipped cream into the cream cheese mixture in two additions.Use a spatula and light strokes to keep the mixture airy.
- Fill the cups. Pipe or spoon the cheesecake filling over the crusts, leaving room for toppings. Smooth the tops or swirl for a rustic look.
- Chill to set. Cover the cups and refrigerate at least 3–4 hours, or overnight for a firmer set. This step deepens the flavor and helps the layers hold.
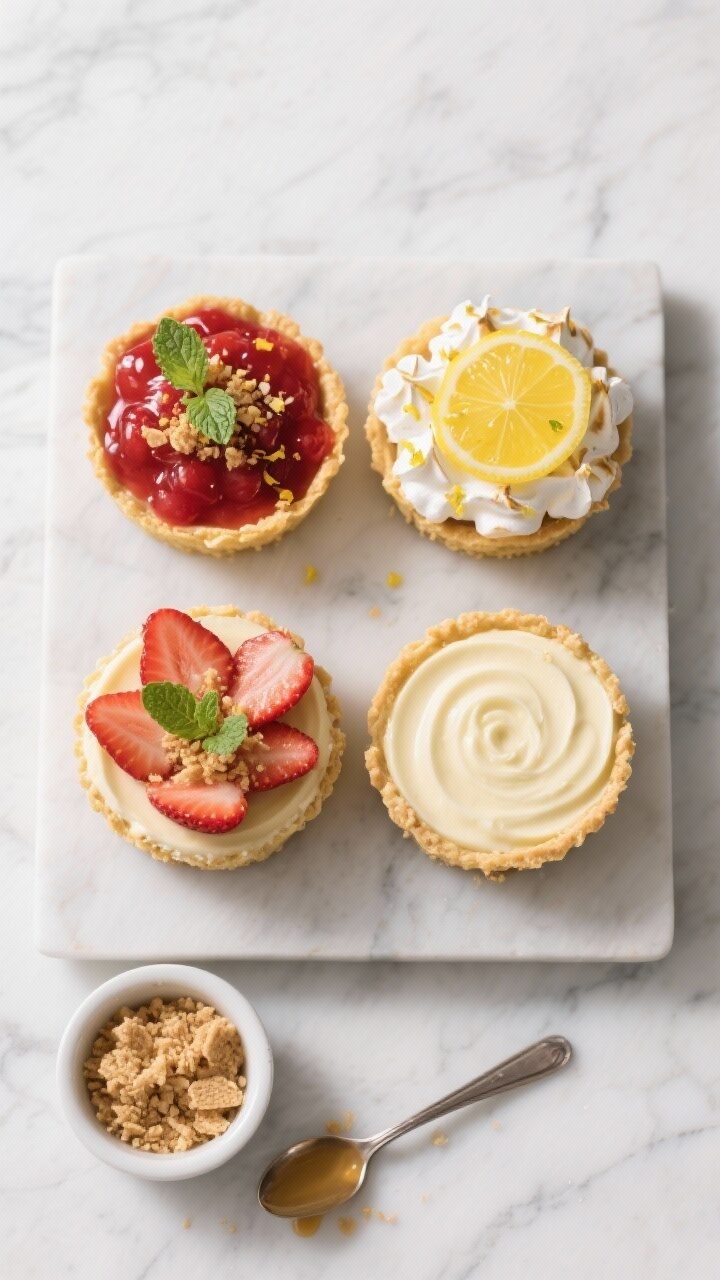
- Add toppings before serving. Spoon on fruit, drizzle chocolate or caramel, or add lemon curd.Garnish with zest, mint, or a sprinkle of crushed crackers for crunch.
What Makes This Special
These cups deliver that classic cheesecake flavor with a fraction of the work.
The crust is buttery and crisp, the filling is smooth and lightly tangy, and the toppings add color and freshness. Because they set in the fridge, the texture stays light instead of dense. They’re portion-controlled, easy to transport, and perfect for parties or weeknight cravings.
And since there’s no baking, they’re summer-friendly and practically fail-proof.
Shopping List
- Cream cheese (16 oz/450 g, full-fat, room temperature)
- Heavy cream (1 cup/240 ml) or whipping cream
- Granulated sugar (1/2 cup/100 g) or powdered sugar (2/3 cup/80 g)
- Vanilla extract (2 teaspoons)
- Lemon juice (1–2 tablespoons, fresh) and lemon zest (optional)
- Graham crackers (10–12 full sheets) or digestive biscuits
- Unsalted butter (5 tablespoons/70 g), melted
- Pinch of salt (for the crust)
- Toppings of choice: fresh berries, berry compote, lemon curd, chocolate shavings, caramel sauce, toasted coconut, or chopped nuts
- Optional add-ins: sour cream (1/4 cup for extra tang), almond extract (a few drops), or a splash of bourbon or rum (1 teaspoon) for a grown-up twist
- Serving cups: 8–10 small jars, tumblers, or clear plastic dessert cups
Instructions
- Prep your tools. Set out 8–10 small cups. Bring cream cheese to room temperature so it blends smoothly. Chill a mixing bowl and beaters for whipping cream.
- Make the crust crumbs. Crush graham crackers in a food processor or a zip-top bag with a rolling pin until fine.Aim for sandy crumbs with a few tiny bits for texture.
- Add butter and salt. Stir melted butter and a pinch of salt into the crumbs until they feel like damp sand. If the mixture looks dry, add another teaspoon of butter.
- Layer the crust. Spoon 2–3 tablespoons of crumb mixture into each cup. Press down gently with the back of a spoon or a small glass to form a compact base.Chill while you make the filling.
- Whip the cream. In your chilled bowl, whip heavy cream to medium-stiff peaks. Don’t overmix. Set aside.
- Beat the cream cheese. In a separate bowl, beat cream cheese until smooth and fluffy, 2–3 minutes.Add sugar, vanilla, and lemon juice. Beat until silky with no lumps. If using sour cream, blend it in now.
- Fold in the whipped cream. Gently fold the whipped cream into the cream cheese mixture in two additions.Use a spatula and light strokes to keep the mixture airy.
- Fill the cups. Pipe or spoon the cheesecake filling over the crusts, leaving room for toppings. Smooth the tops or swirl for a rustic look.
- Chill to set. Cover the cups and refrigerate at least 3–4 hours, or overnight for a firmer set. This step deepens the flavor and helps the layers hold.
- Add toppings before serving. Spoon on fruit, drizzle chocolate or caramel, or add lemon curd.Garnish with zest, mint, or a sprinkle of crushed crackers for crunch.
Keeping It Fresh
Cover the cups tightly and store them in the fridge for up to 4 days. Add juicy toppings like fresh berries or compote right before serving to avoid excess liquid. If you’re prepping ahead, keep toppings in separate containers.
The crust stays crisper if you assemble the fillings and crusts the same day you serve. For transport, place the cups in a shallow pan and cover with plastic wrap so they don’t tip.
Health Benefits
These dessert cups are indulgent, but you can make smart swaps. Protein and calcium from cream cheese and dairy help support bones and satiety. Adding fresh berries boosts antioxidants and fiber.
Lemon juice provides a touch of vitamin C and bright flavor so you can use slightly less sugar.
Want a lighter version? Use reduced-fat cream cheese, swap part of the cream with Greek yogurt, and sweeten with maple syrup or honey in moderation. Choose nuts or dark chocolate shavings for toppings to add healthy fats and richer taste without a heavy sugar load.
What Not to Do
- Don’t skip room temperature cream cheese. Cold cream cheese clumps and won’t whip smooth.
- Don’t overwhip the cream. Grainy or nearly-butter cream won’t fold in well and can make the filling greasy.
- Don’t drench the crust. Too much butter makes it soggy; too little and it falls apart.Aim for damp sand texture.
- Don’t skip the chill time. The filling needs hours to set. Rushing leads to runny layers.
- Don’t overload with wet toppings early. Add juicy fruit or warm sauces right before serving to keep the texture clean.
Variations You Can Try
- Strawberry Shortcake Style: Layer diced strawberries and a spoon of strawberry jam between two layers of cheesecake filling.
- Lemon Burst: Add extra lemon zest to the filling and top with lemon curd and crushed meringues.
- Chocolate Lover’s: Fold in 2 tablespoons cocoa powder and a handful of mini chocolate chips. Top with shaved dark chocolate.
- Salted Caramel Pretzel: Swap part of the crust crumbs for crushed pretzels.Finish with caramel and a tiny pinch of flaky salt.
- Tropical: Use coconut cookies for the crust and top with pineapple, mango, and toasted coconut.
- Peanut Butter Swirl: Beat 1/3 cup creamy peanut butter into the filling and swirl in a touch of melted chocolate.
- Berry Cheesecake “Parfait”: Alternate layers of filling with blueberries or raspberries for a striped look.
- Mini Tiramisu Cups: Use crushed ladyfingers for the crust, add a splash of coffee to the filling, and dust with cocoa.
FAQ
Can I make these ahead?
Yes. Make the cups up to 24 hours ahead and keep them covered in the fridge. Add fresh fruit or sauces just before serving for the best texture.
What’s the best substitute for graham crackers?
Digestive biscuits, vanilla wafers, Biscoff cookies, or shortbread work well.
Adjust butter slightly if the crumbs feel too dry or oily.
Can I freeze no-bake cheesecake cups?
You can, but the texture softens as they thaw. Freeze without toppings for up to one month, thaw overnight in the fridge, then add toppings before serving.
Why is my filling runny?
Likely causes are under-whipped cream, not enough chill time, or too much liquid flavoring. Whip cream to medium-stiff peaks, fold gently, and chill at least 3–4 hours.
Is powdered sugar better than granulated?
Either works.
Powdered sugar blends faster and can make the filling silkier. Granulated sugar is fine if you beat it long enough to dissolve.
Can I make these without dairy?
Yes. Use dairy-free cream cheese, coconut cream (whipped) in place of heavy cream, and vegan butter for the crust.
Check your cookies to ensure they’re dairy-free.
How do I prevent a soggy crust?
Press the crust firmly, chill it before filling, and avoid adding wet toppings too far in advance. If using very buttery cookies, reduce added butter by a tablespoon.
What size cups should I use?
Four to six ounces is ideal for individual servings. For smaller bites, use 3-ounce cups and reduce the crust and filling amounts accordingly.
Can I reduce the sugar?
Yes.
Start with 1/3 cup sugar and adjust to taste. A little extra lemon juice or zest helps balance flavor when you cut back on sweetness.
Do I need gelatin to set the filling?
No. The whipped cream and chill time give enough structure.
If you want a firmer, sliceable texture in larger cups, you can bloom 1 teaspoon of gelatin in water, melt gently, and blend into the filling.
In Conclusion
No-bake cheesecake dessert cups are simple to make, easy to customize, and always a crowd-pleaser. The balance of buttery crunch and creamy filling never gets old, and the make-ahead factor is a lifesaver. Keep a few topping ideas on hand, and you’ve got a reliable dessert for any season.
Once you try them, they’ll become your go-to for gatherings, weeknights, and everything in between.