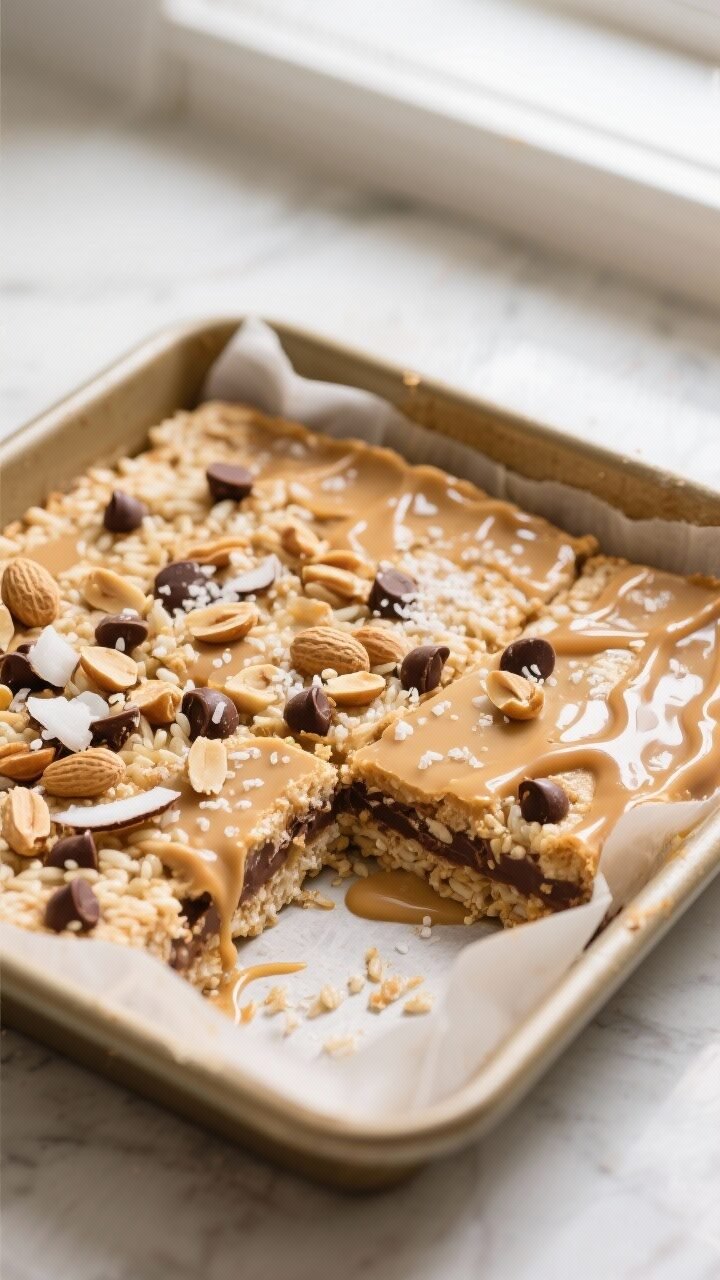
Peanut Butter Rice Cake Magic Bars – Crunchy, Gooey, and Totally Snackable
Peanut butter and chocolate are already a winning combo, but add in light, crispy rice cakes and you get something special. These Peanut Butter Rice Cake Magic Bars are sweet, salty, crackly, and gooey all at once. They’re the kind of treat you make when you want dessert without a lot of fuss.
No fancy equipment, no complicated steps—just layers of flavor that taste like nostalgia with a twist. Make them for a quick weeknight dessert, a party tray, or a fun after-school snack.

Peanut Butter Rice Cake Magic Bars - Crunchy, Gooey, and Totally Snackable
Ingredients
Method
- Prep the pan: Heat the oven to 350°F (175°C). Line an 8x8-inch baking pan with parchment paper, leaving overhang on two sides for easy lifting. Lightly grease the parchment.
- Crush the rice cakes: Break rice cakes into a large bowl and crush with your hands until you have small, uneven pieces.Aim for a mix of crumbs and pea-sized bits for better texture.
- Make the base: In a small saucepan over low heat, melt the butter and peanut butter with the brown sugar and salt, stirring until smooth. Remove from heat and stir in the vanilla.
- Bind the crumbs: Pour the warm peanut butter mixture over the crushed rice cakes. Stir gently to coat evenly.Press this mixture firmly into the prepared pan to form the base.
- Add the chocolate layer: Sprinkle the chocolate chips evenly over the base. Follow with the peanut butter chips (or chopped peanut butter cups), chopped peanuts, and shredded coconut if using.
- Finish with condensed milk: Slowly drizzle the sweetened condensed milk over the top, covering as much surface as possible. It will seep into the gaps and bind everything together.
- Bake: Place in the oven and bake for 18–22 minutes, until the edges are golden and the center looks set and glossy.
- Cool and set: Remove from the oven and cool in the pan for at least 1 hour.For clean cuts, chill in the fridge for another 30–45 minutes.
- Finish and slice: Sprinkle with flaky sea salt if you like, then lift the slab out using the parchment and cut into 12–16 bars with a sharp knife.
What Makes This Recipe So Good
- Texture heaven: Crispy rice cakes and crunchy nuts meet gooey chocolate and peanut butter. Every bite is satisfying.
- Low lift, big payoff: You melt, mix, layer, and bake.That’s it. No special techniques required.
- Flexible ingredients: Use dairy-free chocolate, gluten-free rice cakes, or swap nuts for seeds. It all still works.
- Snack-meets-dessert: Sweet enough to feel like a treat, light enough to enjoy with afternoon coffee or after dinner.
- Kid-friendly and crowd-pleasing: Familiar flavors with a fun twist.Great for parties, potlucks, or gifting.
Shopping List
- Rice cakes: 5–6 plain rice cakes (about 4–5 cups crushed)
- Creamy peanut butter: 3/4 cup (natural or conventional)
- Unsalted butter: 6 tablespoons (or coconut oil for dairy-free)
- Sweetened condensed milk: 1 can (14 ounces; use coconut condensed milk for dairy-free)
- Brown sugar: 1/4 cup (light or dark)
- Vanilla extract: 1 teaspoon
- Salt: 1/2 teaspoon (plus a pinch for topping, optional)
- Chocolate chips: 1 1/2 cups (semi-sweet or dark)
- Peanut butter chips or chopped peanut butter cups: 1 cup
- Chopped peanuts: 1/2 cup (or almonds, cashews, or sunflower seeds)
- Shredded coconut: 1/2 cup (optional but classic for “magic bars”)
- Flaky sea salt: For finishing (optional)
- Nonstick spray or parchment paper: For lining the pan
Instructions

- Prep the pan: Heat the oven to 350°F (175°C). Line an 8×8-inch baking pan with parchment paper, leaving overhang on two sides for easy lifting. Lightly grease the parchment.
- Crush the rice cakes: Break rice cakes into a large bowl and crush with your hands until you have small, uneven pieces.Aim for a mix of crumbs and pea-sized bits for better texture.
- Make the base: In a small saucepan over low heat, melt the butter and peanut butter with the brown sugar and salt, stirring until smooth. Remove from heat and stir in the vanilla.
- Bind the crumbs: Pour the warm peanut butter mixture over the crushed rice cakes. Stir gently to coat evenly.Press this mixture firmly into the prepared pan to form the base.
- Add the chocolate layer: Sprinkle the chocolate chips evenly over the base. Follow with the peanut butter chips (or chopped peanut butter cups), chopped peanuts, and shredded coconut if using.
- Finish with condensed milk: Slowly drizzle the sweetened condensed milk over the top, covering as much surface as possible. It will seep into the gaps and bind everything together.
- Bake: Place in the oven and bake for 18–22 minutes, until the edges are golden and the center looks set and glossy.
- Cool and set: Remove from the oven and cool in the pan for at least 1 hour.For clean cuts, chill in the fridge for another 30–45 minutes.
- Finish and slice: Sprinkle with flaky sea salt if you like, then lift the slab out using the parchment and cut into 12–16 bars with a sharp knife.
How to Store
- Room temperature: Keep in an airtight container for up to 3 days. Layers stay slightly gooey and the rice cake base remains crisp.
- Refrigerator: Store up to 1 week. The bars firm up more and the flavors deepen.Let sit at room temp for 10 minutes before eating.
- Freezer: Freeze for up to 2 months. Wrap each bar in parchment and place in a freezer bag. Thaw in the fridge or at room temp for 20–30 minutes.
Why This is Good for You
- Balanced satisfaction: Peanut butter adds protein and healthy fats, which help keep you full and curb sugar spikes.
- Built-in portion control: Bars are easy to cut into smaller pieces for a sweet bite without going overboard.
- Customizable ingredients: You can lower sugar by using dark chocolate, reduce sodium with unsalted nuts, or opt for dairy-free swaps.
- Energy-friendly snack: Great for lunchboxes or a pre-hike treat.They’re sweet, but they also offer staying power.
Common Mistakes to Avoid
- Over-crushing the rice cakes: If you grind them into dust, the base can turn dense. Keep some texture.
- Skipping the parchment: These bars are sticky. Parchment with overhang makes lifting and slicing much easier.
- Under-baking: If the condensed milk isn’t set and the edges aren’t lightly golden, the bars won’t hold together well.
- Cutting while hot: Warm bars fall apart.Cool completely and, for best results, chill before slicing.
- Using too much condensed milk: More isn’t better. Too much can flood the base and make it soggy.
Alternatives
- Nut-free: Swap peanut butter for sunflower seed butter and use seeds instead of nuts. Choose chocolate that’s processed in a nut-free facility if needed.
- Dairy-free: Use coconut oil instead of butter, dairy-free chocolate chips, and coconut condensed milk.
- Gluten-free: Most plain rice cakes are gluten-free, but check labels.Ensure add-ins like chocolate and candies are certified GF.
- Flavor twists: Add cinnamon to the base, sprinkle mini marshmallows on top before baking, or swirl 2 tablespoons of jam over the base for a PB&J vibe.
- Extra crunch: Mix in crushed pretzels or cornflakes with the rice cakes for a salty snap.
- Lighten it up: Reduce chocolate to 1 cup, use dark chocolate (70%), and skip the coconut to cut sweetness.
FAQ
Can I use chunky peanut butter?
Yes. Chunky peanut butter adds even more texture. Just make sure it melts smoothly with the butter so it coats the rice cake crumbs evenly.
Do I need to pre-bake the rice cake base?
No.
The base holds together as the peanut butter mixture sets and the condensed milk bakes over the top. Press the base firmly so it doesn’t crumble.
What if I don’t have sweetened condensed milk?
You can use coconut condensed milk or make a quick substitute by simmering 2 cups milk with 2/3 cup sugar until reduced by half, but the texture won’t be exactly the same.
How do I prevent the chocolate from blooming or turning gray?
Let the bars cool at room temperature before refrigerating. Rapid temperature changes can cause bloom.
It’s harmless, but cooling gently keeps the chocolate looking shiny.
Can I double the recipe?
Absolutely. Use a 9×13-inch pan and add a few extra minutes to the bake time. Watch for golden edges and a set, glossy top.
Will this work with flavored rice cakes?
Lightly salted or plain works best.
Sweet flavors can make the bars overly sweet, and savory flavors may clash.
How can I make cleaner slices?
Chill the bars until firm, use a long, sharp knife, and wipe the blade between cuts. A gentle sawing motion helps preserve the layers.
Are these bars very sweet?
They’re sweet, like traditional magic bars, but the peanut butter and salt balance things out. Use dark chocolate and reduce the peanut butter chips if you prefer less sweetness.
Final Thoughts
Peanut Butter Rice Cake Magic Bars are simple, fun, and wildly satisfying.
They deliver the comfort of classic magic bars with a lighter, crunchier base that keeps each bite interesting. Keep the pantry staples on hand, and you can whip up a batch anytime a craving hits. Whether you make them kid-friendly or dress them up with dark chocolate and flaky salt, they’ll disappear fast.